
This course works through the methods of managing source data with FME Flow. However, if you want to learn more about data integration in general, we recommend you browse these learning resources:
After completing this lesson, you’ll be able to:
In this lesson, you will:
After completing this lesson, you’ll be able to:
In this lesson, you will:
Nearly every FME workspace starts by reading features from a source dataset. Sometimes, that source dataset may reside in a database or be stored on a web service such as Google Drive; it may even be a database running on a web service! On other occasions, the data may not be web-based, but exist on a shared file system. FME supports integrations with thousands of systems, and you can read more about them on our Integrations web page.
Nearly every FME workspace starts by reading features from a source dataset. Sometimes, that source dataset may reside in a database or be stored on a web service such as Google Drive; it may even be a database running on a web service! On other occasions, the data may not be web-based, but exist on a shared file system. FME supports integrations with thousands of systems, and you can read more about them on our Integrations web page.
In general, it's easy to author a workspace for FME Flow because you can publish and run workspaces from FME Form on FME Flow with minimal alteration of the source data.
However, there are additional methods you can use to improve source data management on FME Flow. These methods include:
This course works through the methods of managing source data with FME Flow. However, if you want to learn more about data integration in general, we recommend you browse these learning resources:
When you publish workspaces to FME Flow, the Reader parameters do not change, and you can only change them if you create User Parameters. Self-serve workflows benefit from User Parameters that take source data as user input.
If you provide a default value to the user parameter, FME Flow displays it in the User Parameters section once you select the workspace to run. The end user running the workspace can keep the default value or use a different source dataset.
Providing source data files as parameters enables maximum flexibility in self-serve workflows. Explore the options for entering source data into your workspace on FME Flow.
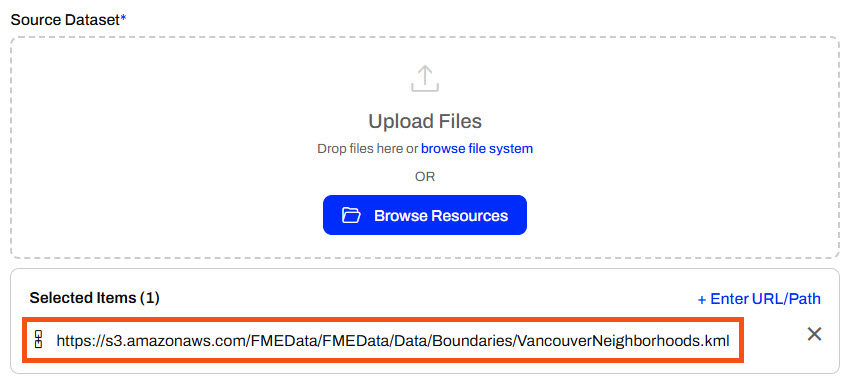
You can enter URLs for datasets hosted online (e.g., public datasets, open data portals, or internal servers). When you enter the URL and run the workspace, FME Flow downloads the data directly from the online source. This method saves you from downloading it from the online source and then uploading it to FME Flow, and is especially useful for large files. An FME Flow Automation may process data from live links to ensure your workflows use the most up-to-date data.
You can enter direct file paths to access datasets on the FME Flow server's local file system. You can enter file paths, such as C:\Data\zoning.shp, or network share paths, such as \\fileserver\gis\roads.tab. This method is useful for server-side file access without uploading anything through the browser. FME Flow will read the data from the path rather than uploading the dataset through the Browse File System option.

This option only works if FME Flow has permission to access the file path provided. Unless FME Flow is installed on your computer, it doesn't have access to your C: drive and will access the C: drive on the server it is installed on. For shared network drives, the FME Flow service account must have permission to access the file and it's folder location. See Workspace Fails on FME Flow When Using UNC Paths for more information.
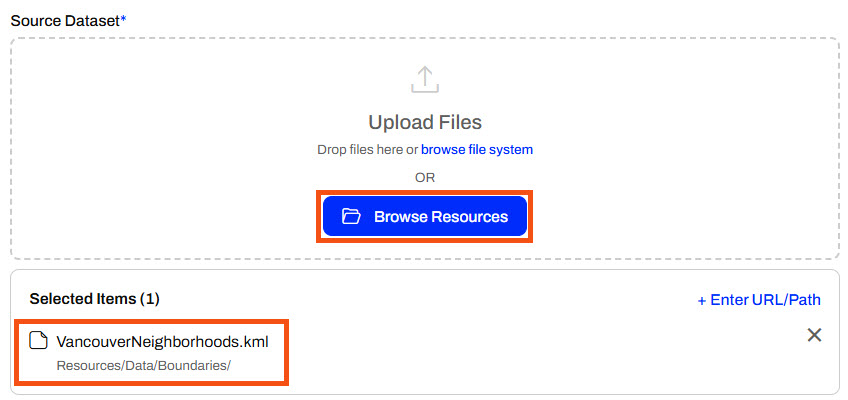
You will want to use the Browse Resources option when the source file is already uploaded to FME Flow's Resources, such as in the Data or Temp folders. It's ideal to store data in Resources if the file will be used across multiple jobs or workflows to avoid repeated uploads, ensure consistency, and support shared access.
You can also browse your file system to select the file to upload to FME Flow. This option is practical when you prefer to navigate your folders manually rather than drag-and-drop, or when your device does not support drag-and-drop. Uploading a file to FME Flow this way is better than using the Enter File Path option if the machine you're using to access FME Flow is not the FME Flow host, as it ensures access to the file.
The selected file will appear as Uploaded for FME Flow to use as source data.
The drag-and-drop file method is best if you have a local file ready and want a quick and easy upload. It is also very convenient if you already have the desired file open in the file explorer. Ultimately, this option is best for ad hoc, one-time runs of your workspace where the file is only needed once.

Once you drop the file, it will upload and be ready to use as input to your workspace.

If you add source datasets by uploading at runtime, FME Flow temporarily stores the files. FME Flow stores a workspace's temporary uploads in Resources > System > temp > upload > Repository > Workspace > auth-user > User > User. By default, FME Flow stores files and removes them after 24 hours via system cleanup tasks, which apply to files you add via the Browse File System and the Drop files feature.
Suppose you rerun the workspace before the cleanup task removes the temporary data. In that case, you can select previously uploaded files for the workspace by clicking the Browse Resources option in the source file parameter and navigating to the Temporary Uploads tab. You may select the file as the source dataset to rerun the workspace.
There are some cautions and limitations to consider when end-users upload data for translation:

Sven, a city government planning analyst, is starting to run his workflows on FME Flow. He created a workspace that reads in Neighborhood polygons from KML and reprojects them to UTM83-10 to match VotingPlaces points (read from GML). The Clipper then clips VotingPlaces by the Neighborhoods boundaries and writes out the boundaries and a separate layer of voting places for each neighborhood to a geodatabase. While the neighborhood boundaries data does not change, the voting location data may change frequently, so that the user can upload new temporary data through a User Parameter.
For this exercise, follow these steps to help Sven publish his workspace to FME Flow and then run it on FME Flow with temporarily uploaded data.
Open the starting workspace (C:\FMEData\Workspaces\DeployWorkflowsWithFMEFlow\input-source-data-at-runtime.fmw) in FME Workbench. It reads Voting Places (GML) and Neighborhoods (KML) data, clips the Voting Places to the Neighborhoods, and writes the data to a geodatabase to keep it up to date with the most accurate voting information.

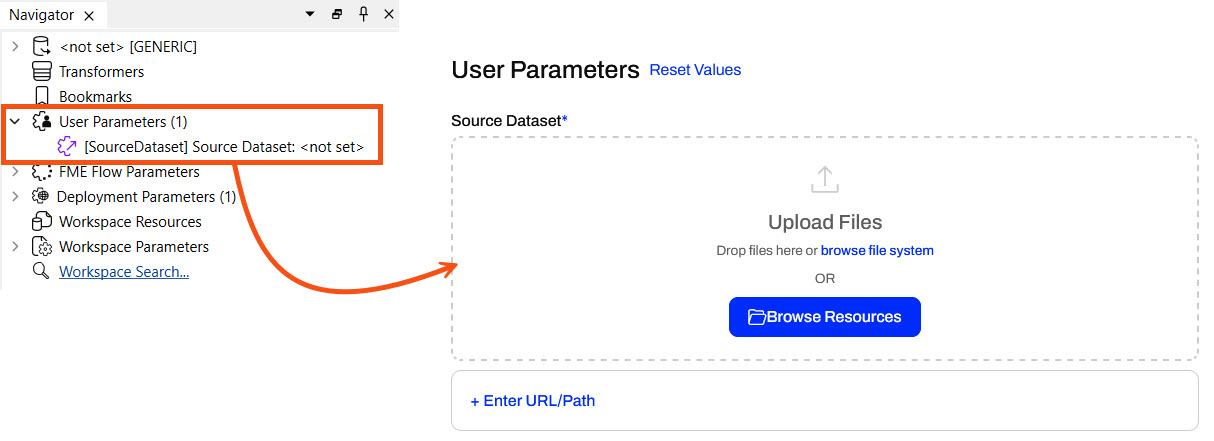
To collect user input for the source data, the workspace uses user parameters for each source file. In the Navigator window, expand the User Parameters section to inspect the user parameters.
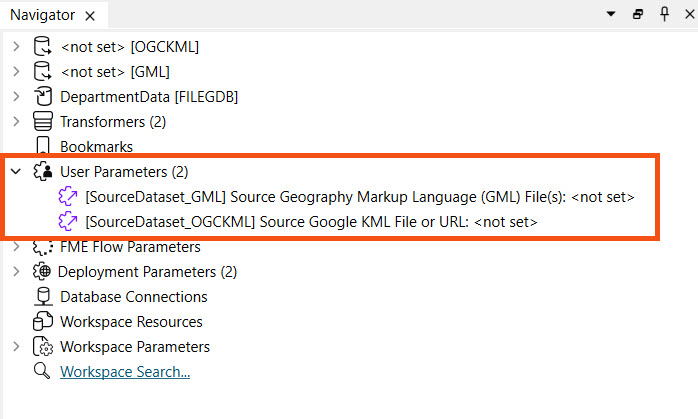
Currently, the default source data values are empty. That is okay because FME Flow will require the workspace user to input values for the source dataset parameters.
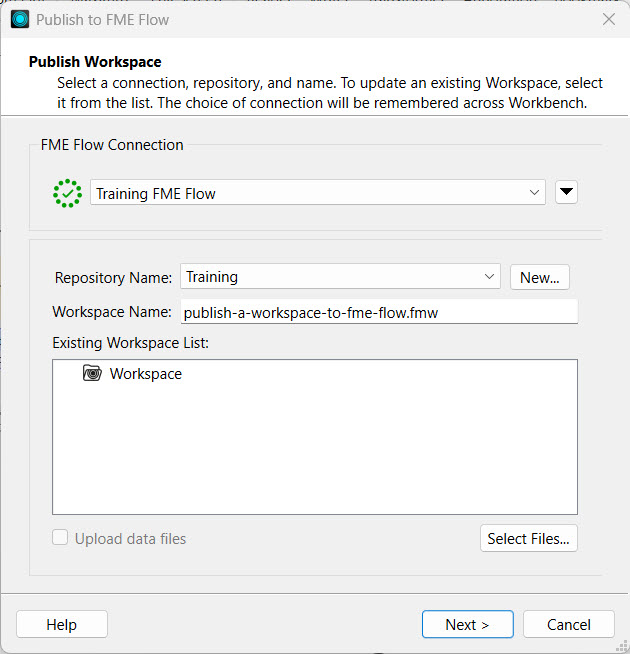
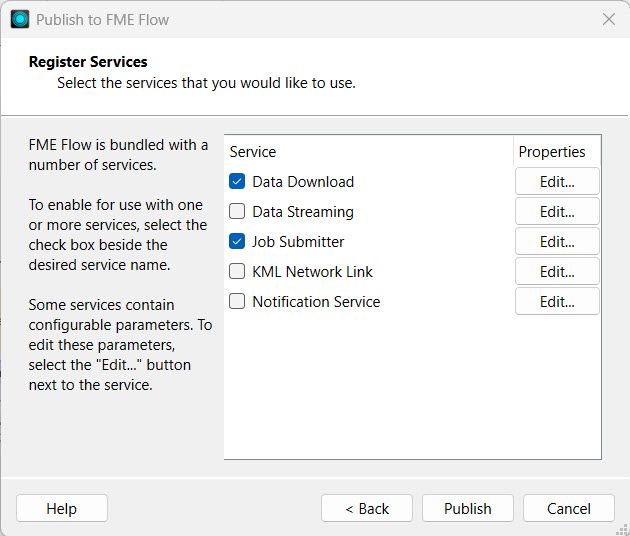
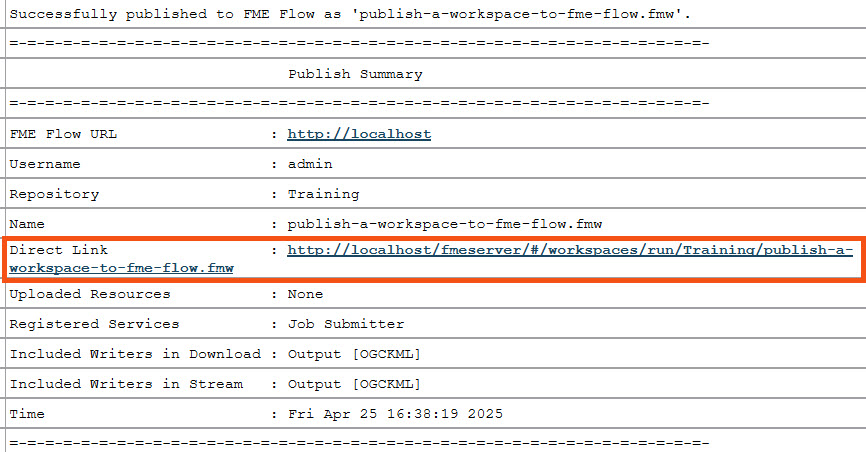
Publish the workspace to FME Flow, save it in the Training repository, and register it with the Job Submitter service.

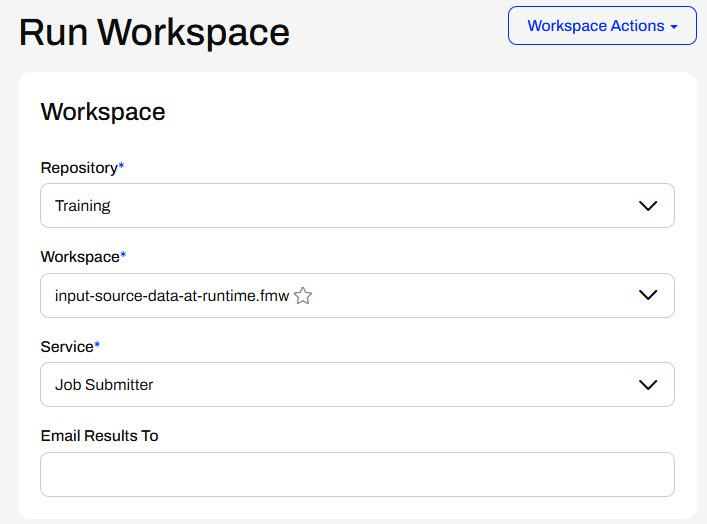
Navigate to FME Flow and open the Run Workspace page, and configure it to run your recently published workspace.
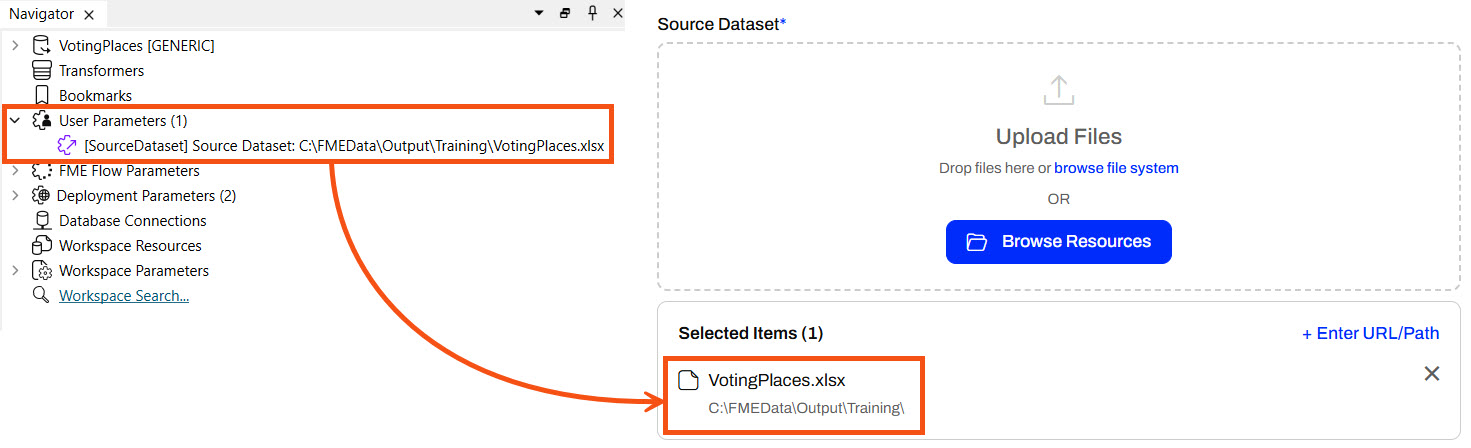
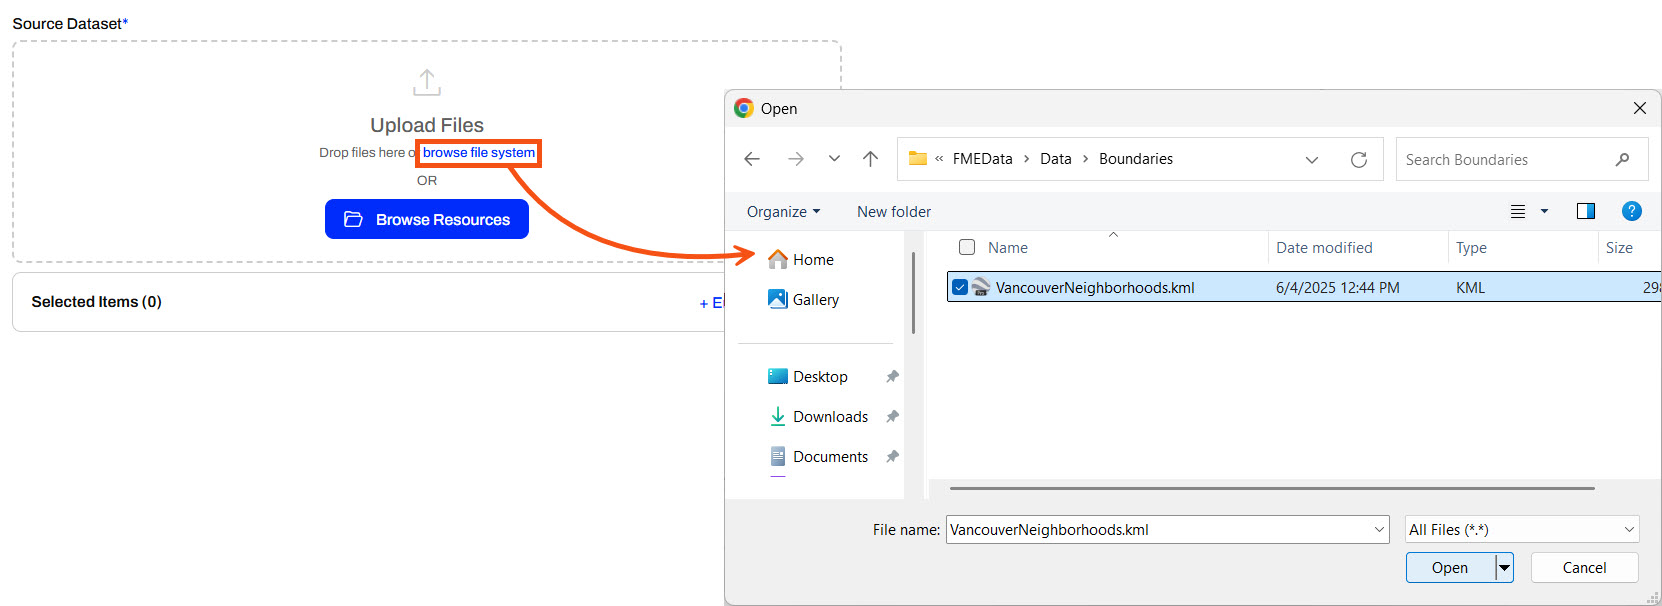
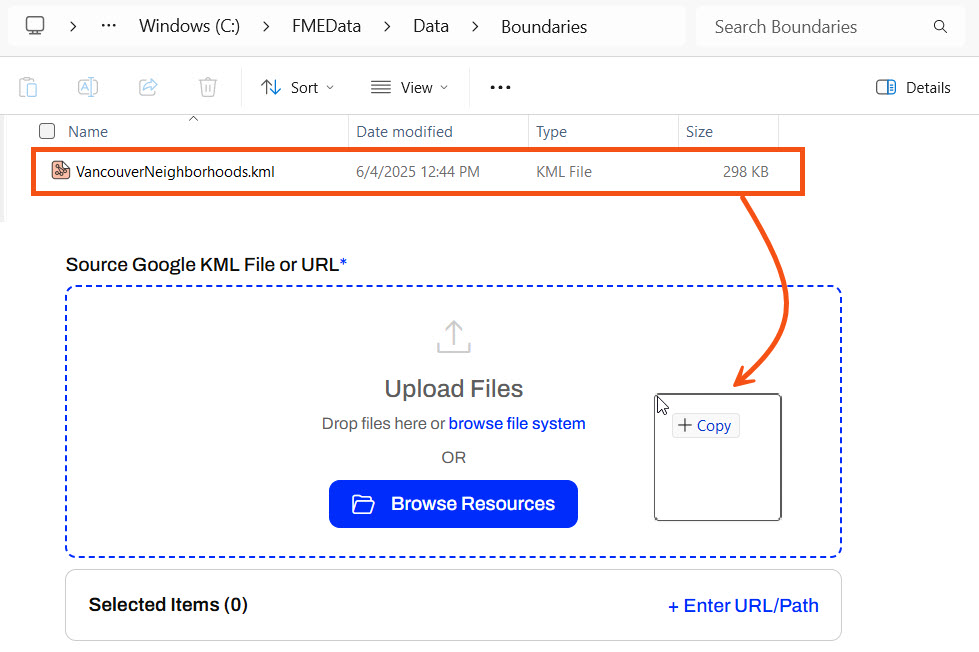
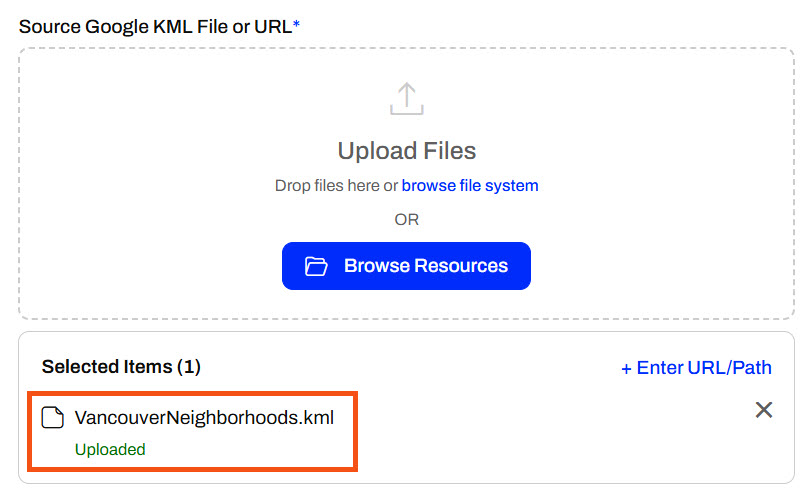
Under User Parameters, you will see the parameters to set each source dataset. Open the Windows File Explorer and navigate to VancouverNeighborhoods.kml (C:\FMEData\Data\Boundaries\VancouverNeighborhoods.kml). Drag the KML file into the Upload Files area of the Source Google KML File or URL parameter.
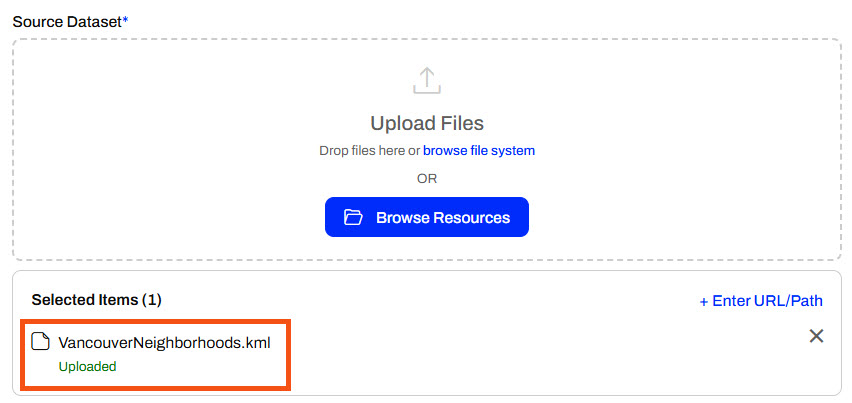
Once you drop the file, FME Flow uploads it to temporary uploads and uses it as input to the workspace.
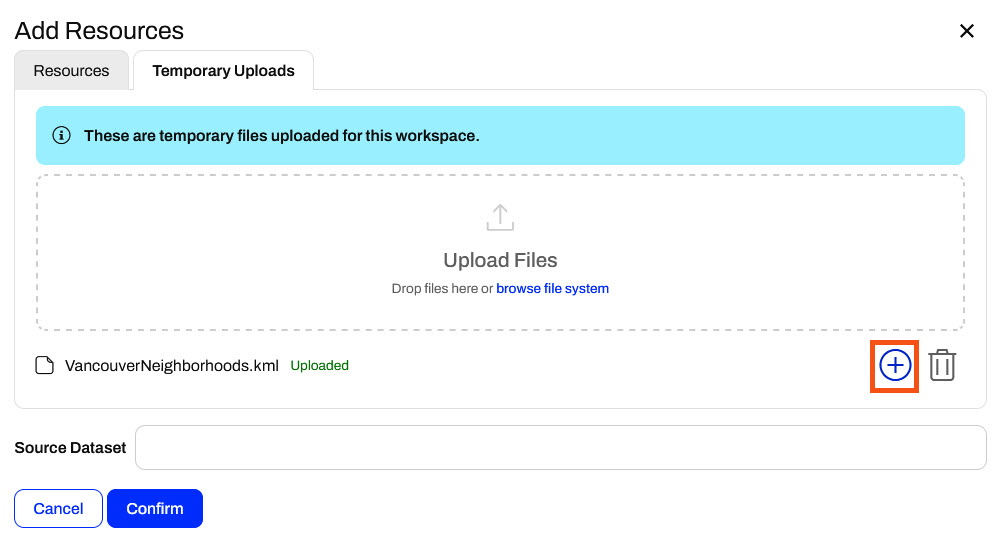
For the Source GML File, GML files require an accompanying XSD (XML Schema Definition) file to be interpreted correctly. Therefore, you will need to set the GML file as the source file and have the supporting XSD file in the same directory. To upload both files as Temporary Uploads, click Browse Resources.

Click the Temporary Uploads tab. Select and drag both ElectionVoting.gml and ElectionVoting.xsd (C:\FMEData\Data\Elections) files to the Upload Files area. Because you only need the ElectionVoting.gml file as the source file, deselect the XSD file in the Selected Items column. The VancouverNeighborhoods.kml file you uploaded in the previous step is also listed in Temporary Uploads since FME Flow stores the uploaded files in the same location. So, FME Flow stores the ElectionVoting.xsd file in the Temporary Uploads location, but does not make it a source file input to the workspace.
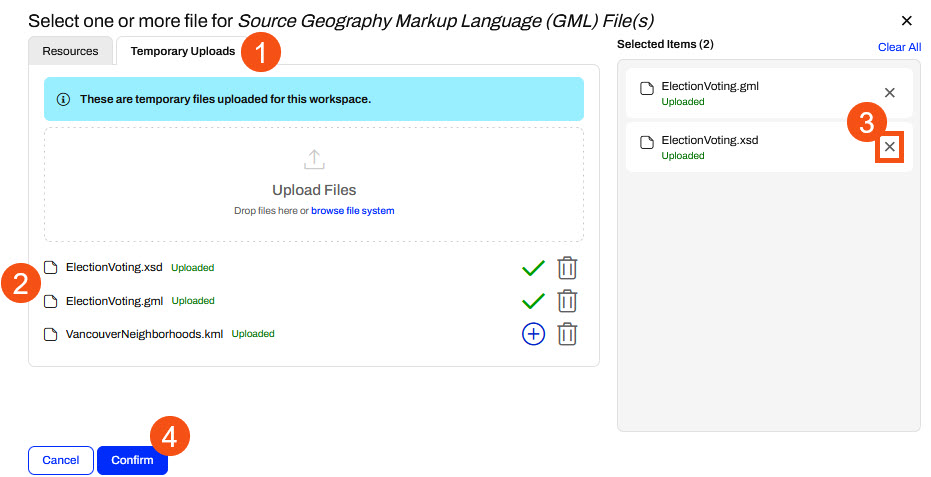
Click Confirm, then check that FME Flow includes only the GML file for the source parameter.

This method is useful for formats that require "sidecar" files, such as Esri Shapefile or MapInfo TAB. If the XSD file wasn't necessary, you could simply upload the GML file directly on the Run Workspace page.
If your workspace fails here, make sure that you've uploaded both the ElectionVoting.gml and ElectionVoting.xsd files (C:\FMEData\Data\Elections\) to Temporary Uploads, but only the ElectionVoting.gml file is selected for the parameter input.
Click Run to submit the workspace to run on an FME Engine. The workspace uses the temporarily uploaded data as input.
In FME 2025.0.1, there is a bug that disables the Run button once the ElectionVoting.gml and ElectionVoting.xsd files have been added to Temporary Uploads. If you encounter this, refresh the browser page and select the KML and GML files from Temporary Uploads in Browse Resources again.
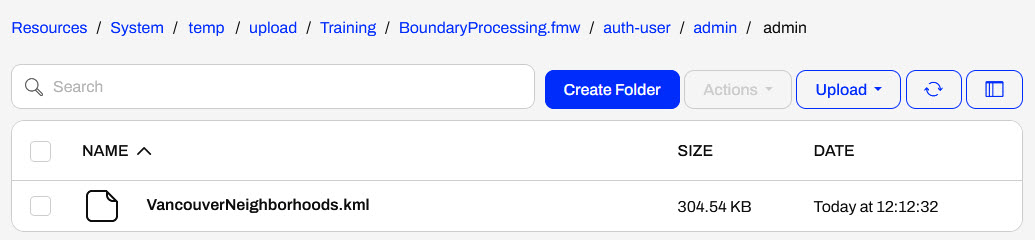
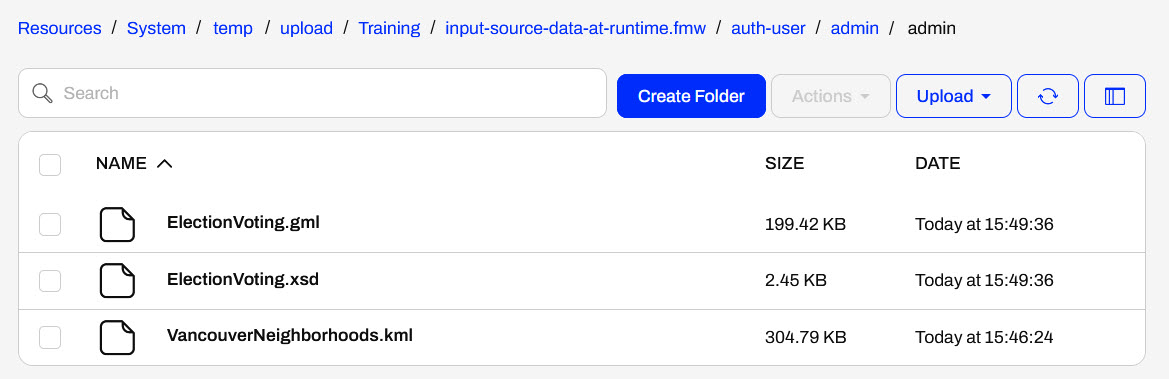
To review the temporarily uploaded files, navigate to Resources > System > temp > upload > Training > input-source-data-at-runtime.fmw > auth-user > admin > admin.
You used FME Flow's Temporary Uploads to input source data to a workspace at runtime, which is a great method for data that changes frequently or isn't used in workspaces often. However, since FME Flow removes these files after 24 hours, Sven will continue using other options to store and input source data on FME Flow to minimize end-user effort.
In general, it's easy to author a workspace for FME Flow because you can publish and run workspaces from FME Form on FME Flow with minimal alteration of the source data.
However, there are additional methods you can use to improve source data management on FME Flow. These methods include:
This course works through the methods of managing source data with FME Flow. However, if you want to learn more about data integration in general, we recommend you browse these learning resources:
When you publish workspaces to FME Flow, the Reader parameters do not change, and you can only change them if you create User Parameters. Self-serve workflows benefit from User Parameters that take source data as user input.
If you provide a default value to the user parameter, FME Flow displays it in the User Parameters section once you select the workspace to run. The end user running the workspace can keep the default value or use a different source dataset.
Providing source data files as parameters enables maximum flexibility in self-serve workflows. Explore the options for entering source data into your workspace on FME Flow.
You can enter URLs for datasets hosted online (e.g., public datasets, open data portals, or internal servers). When you enter the URL and run the workspace, FME Flow downloads the data directly from the online source. This method saves you from downloading it from the online source and then uploading it to FME Flow, and is especially useful for large files. An FME Flow Automation may process data from live links to ensure your workflows use the most up-to-date data.
You can enter direct file paths to access datasets on the FME Flow server's local file system. You can enter file paths, such as C:\Data\zoning.shp, or network share paths, such as \\fileserver\gis\roads.tab. This method is useful for server-side file access without uploading anything through the browser. FME Flow will read the data from the path rather than uploading the dataset through the Browse File System option.
This option only works if FME Flow has permission to access the file path provided. Unless FME Flow is installed on your computer, it doesn't have access to your C: drive and will access the C: drive on the server it is installed on. For shared network drives, the FME Flow service account must have permission to access the file and it's folder location. See Workspace Fails on FME Flow When Using UNC Paths for more information.
You will want to use the Browse Resources option when the source file is already uploaded to FME Flow's Resources, such as in the Data or Temp folders. It's ideal to store data in Resources if the file will be used across multiple jobs or workflows to avoid repeated uploads, ensure consistency, and support shared access.
You can also browse your file system to select the file to upload to FME Flow. This option is practical when you prefer to navigate your folders manually rather than drag-and-drop, or when your device does not support drag-and-drop. Uploading a file to FME Flow this way is better than using the Enter File Path option if the machine you're using to access FME Flow is not the FME Flow host, as it ensures access to the file.
The selected file will appear as Uploaded for FME Flow to use as source data.
The drag-and-drop file method is best if you have a local file ready and want a quick and easy upload. It is also very convenient if you already have the desired file open in the file explorer. Ultimately, this option is best for ad hoc, one-time runs of your workspace where the file is only needed once.
Once you drop the file, it will upload and be ready to use as input to your workspace.
If you add source datasets by uploading at runtime, FME Flow temporarily stores the files. FME Flow stores a workspace's temporary uploads in Resources > System > temp > upload > Repository > Workspace > auth-user > User > User. By default, FME Flow stores files and removes them after 24 hours via system cleanup tasks, which apply to files you add via the Browse File System and the Drop files feature.
Suppose you rerun the workspace before the cleanup task removes the temporary data. In that case, you can select previously uploaded files for the workspace by clicking the Browse Resources option in the source file parameter and navigating to the Temporary Uploads tab. You may select the file as the source dataset to rerun the workspace.
There are some cautions and limitations to consider when end-users upload data for translation:
Sven, a city government planning analyst, is starting to run his workflows on FME Flow. He created a workspace that reads in Neighborhood polygons from KML and reprojects them to UTM83-10 to match VotingPlaces points (read from GML). The Clipper then clips VotingPlaces by the Neighborhoods boundaries and writes out the boundaries and a separate layer of voting places for each neighborhood to a geodatabase. While the neighborhood boundaries data does not change, the voting location data may change frequently, so that the user can upload new temporary data through a User Parameter.
For this exercise, follow these steps to help Sven publish his workspace to FME Flow and then run it on FME Flow with temporarily uploaded data.
Open the starting workspace (C:\FMEData\Workspaces\DeployWorkflowsWithFMEFlow\input-source-data-at-runtime.fmw) in FME Workbench. It reads Voting Places (GML) and Neighborhoods (KML) data, clips the Voting Places to the Neighborhoods, and writes the data to a geodatabase to keep it up to date with the most accurate voting information.
To collect user input for the source data, the workspace uses user parameters for each source file. In the Navigator window, expand the User Parameters section to inspect the user parameters.
Currently, the default source data values are empty. That is okay because FME Flow will require the workspace user to input values for the source dataset parameters.
Publish the workspace to FME Flow, save it in the Training repository, and register it with the Job Submitter service.
Navigate to FME Flow and open the Run Workspace page, and configure it to run your recently published workspace.
Under User Parameters, you will see the parameters to set each source dataset. Open the Windows File Explorer and navigate to VancouverNeighborhoods.kml (C:\FMEData\Data\Boundaries\VancouverNeighborhoods.kml). Drag the KML file into the Upload Files area of the Source Google KML File or URL parameter.
Once you drop the file, FME Flow uploads it to temporary uploads and uses it as input to the workspace.
For the Source GML File, GML files require an accompanying XSD (XML Schema Definition) file to be interpreted correctly. Therefore, you will need to set the GML file as the source file and have the supporting XSD file in the same directory. To upload both files as Temporary Uploads, click Browse Resources.
Click the Temporary Uploads tab. Select and drag both ElectionVoting.gml and ElectionVoting.xsd (C:\FMEData\Data\Elections) files to the Upload Files area. Because you only need the ElectionVoting.gml file as the source file, deselect the XSD file in the Selected Items column. The VancouverNeighborhoods.kml file you uploaded in the previous step is also listed in Temporary Uploads since FME Flow stores the uploaded files in the same location. So, FME Flow stores the ElectionVoting.xsd file in the Temporary Uploads location, but does not make it a source file input to the workspace.
Click Confirm, then check that FME Flow includes only the GML file for the source parameter.
This method is useful for formats that require "sidecar" files, such as Esri Shapefile or MapInfo TAB. If the XSD file wasn't necessary, you could simply upload the GML file directly on the Run Workspace page.
If your workspace fails here, make sure that you've uploaded both the ElectionVoting.gml and ElectionVoting.xsd files (C:\FMEData\Data\Elections\) to Temporary Uploads, but only the ElectionVoting.gml file is selected for the parameter input.
Click Run to submit the workspace to run on an FME Engine. The workspace uses the temporarily uploaded data as input.
In FME 2025.0.1, there is a bug that disables the Run button once the ElectionVoting.gml and ElectionVoting.xsd files have been added to Temporary Uploads. If you encounter this, refresh the browser page and select the KML and GML files from Temporary Uploads in Browse Resources again.
To review the temporarily uploaded files, navigate to Resources > System > temp > upload > Training > input-source-data-at-runtime.fmw > auth-user > admin > admin.
You used FME Flow's Temporary Uploads to input source data to a workspace at runtime, which is a great method for data that changes frequently or isn't used in workspaces often. However, since FME Flow removes these files after 24 hours, Sven will continue using other options to store and input source data on FME Flow to minimize end-user effort.